Final Thoughts.

This project has actually been really fun for me, even though there were some major ups and downs. At the beginning of the module I felt really motivated to create the characters, as I was excited to make a whole character from scratch, all the way from low poly to high poly, to rigging, animating and importing into Unity. It’s something I’ve never done before, but I’ve done little bits and pieces separately so I felt like I had enough knowledge to do succeed. That turned out really well, though I have lost motivation while animating, partially because it was quite repetitive, but mainly because of personal matters that were going on in my life. However, I still think it ended up looking okay, considering it was my first time.

I think the most enjoyable part of that was the high-poly sculpting, as I didn’t have to worry about the polycount or anything like that, I just added as much detail as I wanted to, while sticking to Connor’s concept. I’m not really sure how happy Connor is with the visuals of the game, I feel like it might be quite far from his original concepts and visualisations, but it’s quite hard to translate 2D visuals into 3D. I feel like I may have disappointed him in that regard.

There were some frustrating parts in character creation, mainly with Rigging and Animating, but I’m glad I pushed through it. I’m also really proud of George’s input in this module, as he didn’t have much experience with 3D art before, but he’s done really well with very little help.

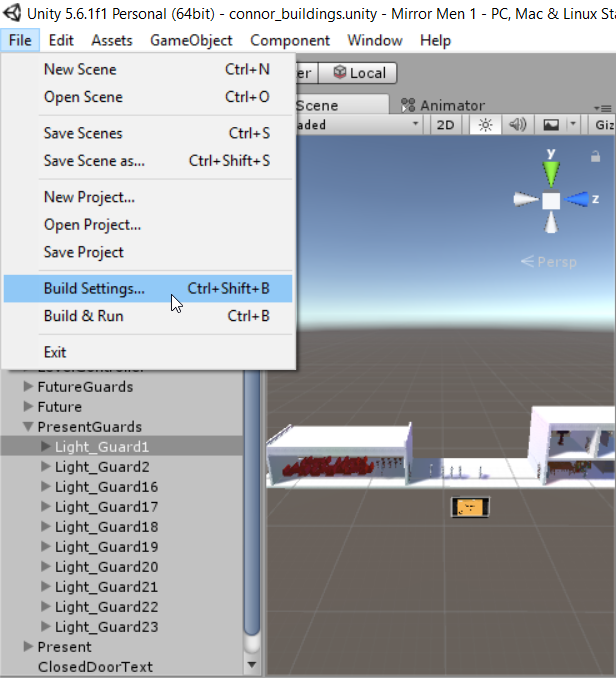
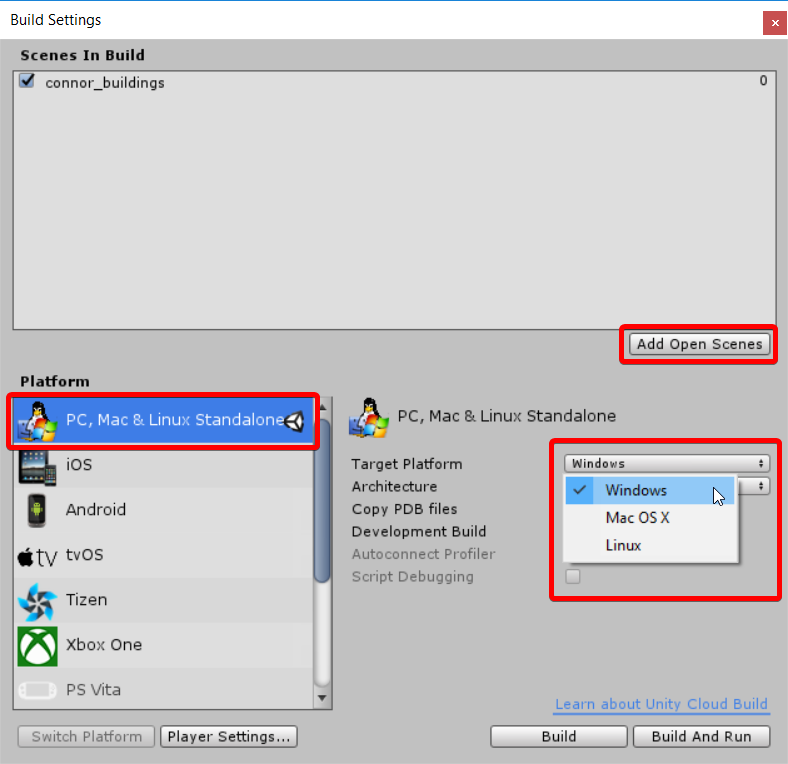
3 weeks before the deadline, there was almost 0 progress with the programming for our game, and I got really worried about it, as there were a lot of mechanics in Connor’s Game Design Document and we didn’t even have a working movement script. So we decided to switch roles around and have me to do the programming and have Cosmin do particle effects etc. I have to say, at that time I was feeling worried (as I wasn’t sure if we’ll get it done on time), scared of programming, and somewhat angry that after 14 weeks we had nothing usable on the programming side of development. However, I saw that as an opportunity to learn programming, as I always felt like it’s something I should know, at least on the basic level.

Going into it, I knew almost nothing. Last year I got overwhelmed by programming and learned almost nothing and I felt like I’ll never understand it. But taking it step by step, starting from the easy stuff, slowly progressing into the more advanced mechanics, I started getting a grasp of how it works. Without James’ help I managed to do the basic things like movement, jump etc. but then I needed James’ help with AI for the enemy guards and User Interface, as I didn’t really have time to learn all of it.

I’m pretty proud of myself for staying motivated throughout the last 3 weeks, I worked really hard as I wanted to prove to myself that I’m able to do something that I thought I’d never be able to do, and I didn’t want our team to fall short because of one team member. And also, I now have a completely new skill that I can (and I will) use in future projects, both for University and not.

Overall, I think this module went really well and I’m really happy I had Connor as a leader as he was always on top of things and gave specific information about what he needed, always replied quickly and whenever I asked for a layout or a quick design of something, he delivered it quickly. George has also done really well with the 3D stuff, and as a huge fan of 3D art, I personally hope he continues developing his skills as it was really nice to see him do so well and learn so many things in just one semester.

Game Builds – Finally!

With all the things in place and how I want them, it’s time to finally make a build of the game. The process is actually really simple, I just had to go to File>Build Settings:

Unity_2017-05-25_00-27-37.png

Then, I clicked “Add Open Scenes” which added the scene to the Build, then for the platform I picked “PC, Mac & Linux Standalone” and then I picked Windows (I also did a Mac version afterwards as that’s what we’ll be using in the exhibition next week) and then clicked Build and Run. After selecting a directory, Unity creates a build file and then you can play the game from an executable file.

Unity_2017-05-25_00-28-53.png

I’ve done this a few times with slight tweaks in the past week, but now I’m happy with the version I submitted, and I’m pretty proud of what I did in this semester. Below are download links to the builds and the Mirror Men Shared Blog:

PC – https://www.sendspace.com/file/0148gf

Mac – https://www.sendspace.com/file/7ing23

Shared Blog – https://mmdevjournal.wordpress.com/

The Unity Project Folder can be found on the memory stick with my submission.

Guards Collision Fix

I have noticed a bug where the guards would collide with each other, regardless of whether their colliders are on or off and they did that even when dead. It didn’t make much sense to me or James, so it actually took me quite a long time to figure out the issue. We started off by making sure all colliders were off, on top of the usual ‘GetComponent<Box Collider>()’ that we already used.

I then played around with Layers in Unity as I thought maybe that could solve the issue. I did that by changing the enemies’ Layer to Enemy, and then went to Edit>Project Settings>Physics where you can find the Layer Collision Matrix which determines which Layers can react with each other. That also didn’t solve the issue, which was odd because when I created a new scene with some cubes, it did work correctly.

That’s when I thought it’s probably an issue with the NavMesh feature, and it turned out I was right. The Obstacle Avoidance feature of the Nav Mesh Agent was causing the issue, and I solved it by changing all the values in that tab to 0 (which weirdly turned some of the values to ‘1e-05’), like so:

Unity_2017-05-25_00-24-06.png

Now, the guards no longer collide with each other:

2017-05-25_00-25-41.gif

Success, Fail and Guide Screens

Next step was to create Pop-ups for when you start the game (a guide showing you the map and what you need to do), the success screen (when you do all the objectives and return to the starting location) and a fail screen (when the player dies). I used Connor’s assets, which I imported into Unity as Sprites. For the starting screen, I parented the sprite to the camera and positioned it in the right place to fit the Game Screen nicely. I also added a script to it. The Script is really simple, all it does is it tells Unity to make it active on Start, then when the Left Mouse Button is pressed, set it to inactive:

using System.Collections;
using System.Collections.Generic;
using UnityEngine;

public class GuidePopup : MonoBehaviour 
{
    private GameObject guide;

    void Start () 
    {
        guide = GameObject.Find (DemoLevelGuide01);
        guide.SetActive (true);
    }

    void Update () 
    {
        if (Input.GetMouseButtonDown (0)) 
        {
            guide.SetActive (false);
        }
    }
}

The Death one was slightly more complicated, but not overly complicated. I’ve used the ‘PlayerStats’ script, as it contains the Health information so it made setting it up easier. First, I made a reference to the correct Pop-up object and set it to inactive by default. Then, I created a new method called Death(), which gets triggered in the if statement in the Update() method with an Invoke (delay in execution) of 5 seconds. The Death() method sets the Pop-up to active, and then if the Left Mouse Button is pressed, the SceneReload() method is executed, which reloads the scene, so the player can start again. Here’s the whole script:

using System.Collections;
using System.Collections.Generic;
using UnityEngine;
using UnityEngine.SceneManagement;

public class PlayerStats : MonoBehaviour 
{

    private object[] stats;
    private GameObject dScreen;

    void Start () 
    {
        //Values used to calculate player activity
        stats = new object[] 
        {
            100,                                                 //0:Health
            6,                                                   //1:Ammo
            50,                                                  //2:Dimension Swap Charge
        }; 
        dScreen = GameObject.Find (UI PopUps01);
        dScreen.SetActive (false);
    }

    public void SetHealth(int newHealth) 
    {
        stats[0] = newHealth;
    }

    public void SetAmmo(int newAmmo) 
    {
        stats[1] = newAmmo;
    }

    public void SetDimCharge(int newCharge) 
    {
        stats[2] = newCharge;
    }

    public object GetStat(int index) 
    {
        return stats [index];
    } 

    void CheckValues() 
    {
        //Keeps stat values within acceptable ranges
        if ((int)stats[0] < 0) 
        {
            stats[0] = 0;
        } 
        else if ((int)stats[0] > 100) 
        {
            stats[0] = 100;
        }

        if ((int)stats[1] < 0) 
        {
            stats[1] = 0;
        } 
        else if ((int)stats[1] > 6) 
        {
            stats[1] = 6;
        }

        if ((int)stats[2] < 0) 
        {
            stats[2] = 0;
        } 
        else if ((int)stats[2] > 50) 
        {
            stats[2] = 50;
        }
            
    }

    void Death()
    {
        dScreen.SetActive(true);
        if (Input.GetMouseButtonDown (0)) 
        {
            SceneReload ();
        }
    }

    void SceneReload()
    {
        SceneManager.LoadScene (connor_buildings);
    }

    void Update () 
    {
        CheckValues ();

        if ((int)stats [0] < 0.1) 
        {
            GetComponent<Animator>().Play (Death);
            GetComponent<PlayerMove> ().enabled = false;
            GetComponent<RotationCheck> ().enabled = false;
            GetComponent<player_computer> ().enabled = false;
            GetComponent<player_button> ().enabled = false;
            GetComponent<Player_sound> ().enabled = false;
            GetComponent<player_takedown> ().enabled = false;
            GetComponent<PlayerActions> ().enabled = false;
            GetComponent<PlayerControls> ().enabled = false;
            GetComponent<player_stairs> ().enabled = false;
            Invoke (Death, 5f);
        }
    }
}

The video below shows both the starting screen and the death screen(note that the reloaded scene has really weird lighting, I looked into that issue and it is a problem with how it’s displayed inside Unity and will not occur in the build of the game):

Lastly, I have made the Mission Complete screen which I did by creating an Empty Child (named ‘MissionComplete’) with a Box Collider set to isTrigger and the trigger box was scaled correctly inside the starting room. I went back to the ‘player_computer’ script and set the new trigger box to be off by default and to only turn on after the second computer has been used.

Then I attached a script to the MissionComplete object, and made a reference to the correct Pop-up sprite and set it to inactive at the start. Then using ‘OnTriggerEnter’ with the Tag “Player”, Unity knows when the player has arrived to the starting location so it displays the pop-up, disables movement and sets the ‘canReload’ bool to true. While that bool is set to true, the player can press the Left Mouse Button to trigger the SceneReload() method, which is the same as in the script above. Here’s the whole script:

using System.Collections;
using System.Collections.Generic;
using UnityEngine;
using UnityEngine.SceneManagement;

public class MissionComplete : MonoBehaviour 
{
    private GameObject wScreen;
    private bool canReload;

    void Start () 
    {
        wScreen = GameObject.Find (UI PopUps02);
        wScreen.SetActive (false);
        canReload = false;
    }

    void OnTriggerEnter(Collider other)
    {
        if (other.tag == Player)
        {
            GameObject.Find (JackTaylor).GetComponent<PlayerMove> ().enabled = false;
            wScreen.SetActive (true);
            canReload = true;
        }
    }

    void SceneReload()
    {
        SceneManager.LoadScene (connor_buildings);
    }

    void Update () 
    {
        if (Input.GetMouseButtonDown (0) && (canReload == true)) 
        {
            SceneReload ();
        }
    }
}

Here’s a gif of the Mission Complete screen pop-up and scene reloading after the computers have been used:

2017-05-25_00-15-58.gif

Mission Objectives

Next I had to set up the objectives for the level, which Connor decided will be using one computer, which unlocks the ability to use the second one, which then spawns more guards and the player has to go back to the building he started at. To do this, I edited the ‘player_computer’ script, by firstly setting the second computer to only activate after the first one has been used, and then enabling the guards after using the second one. It was pretty simple to set up, but it did take me a while to set up the guards and their waypoints.

Here’s the updated script:

using System.Collections;
using System.Collections.Generic;
using UnityEngine;

public class player_computer : MonoBehaviour 
{

    public Animator anim;
    private bool canInteract;
    private bool isInteracting;
    public bool hasUsed;
    private GameObject g16;
    private GameObject g17;
    private GameObject g18;
    private GameObject g19;
    private GameObject g20;
    private GameObject g21;
    private GameObject g22;
    private GameObject g23;
    private GameObject g24;
    private GameObject g25;
    private GameObject g26;
    private GameObject g27;
    private GameObject g28;
    private GameObject g29;
    private GameObject g30;

    void Start () 
    {
        anim = GetComponent<Animator>();
        canInteract = false;
        isInteracting = false;
        hasUsed = false;
        g16 = GameObject.Find (Light_Guard16);
        g16.SetActive (false);
        g17 = GameObject.Find (Light_Guard17);
        g17.SetActive (false);
        g18 = GameObject.Find (Light_Guard18);
        g18.SetActive (false);
        g19 = GameObject.Find (Light_Guard19);
        g19.SetActive (false);
        g20 = GameObject.Find (Light_Guard20);
        g20.SetActive (false);
        g21 = GameObject.Find (Light_Guard21);
        g21.SetActive (false);
        g22 = GameObject.Find (Light_Guard22);
        g22.SetActive (false);
        g23 = GameObject.Find (Light_Guard23);
        g23.SetActive (false);
        g24 = GameObject.Find (Light_Guard24);
        g24.SetActive (false);
        g25 = GameObject.Find (Light_Guard25);
        g25.SetActive (false);
        g26 = GameObject.Find (Light_Guard26);
        g26.SetActive (false);
        g27 = GameObject.Find (Light_Guard27);
        g27.SetActive (false);
        g28 = GameObject.Find (Light_Guard28);
        g28.SetActive (false);
        g29 = GameObject.Find (Light_Guard29);
        g29.SetActive (false);
        g30 = GameObject.Find (Light_Guard30);
        g30.SetActive (false);
    }
        
    void OnTriggerEnter(Collider other)
    {
        if (other.tag == Computer)
        {
            canInteract = true;
            GameObject.Find (TextInteract).GetComponent<MeshRenderer> ().enabled = true;
        }
    }

    void OnTriggerExit(Collider other)
    {
        if (other.tag == Computer)
        {
            canInteract = false;
            GameObject.Find (TextInteract).GetComponent<MeshRenderer> ().enabled = false;
        }
    }

    void Update () 
    {
        if (Input.GetKeyDown (e) && (canInteract == true)) 
        {
            transform.rotation = Quaternion.Euler(0f, 0f, 0f);
            anim.Play (Interact, 1, 0f);
            isInteracting = true;
            GameObject.Find (TextInteract).GetComponent<MeshRenderer> ().enabled = false;
            hasUsed = true;
            if (GameObject.Find (Computer2).GetComponent<BoxCollider> ().enabled == true) 
            {
                g16.SetActive (true);
                g17.SetActive (true);
                g18.SetActive (true);
                g19.SetActive (true);
                g20.SetActive (true);
                g21.SetActive (true);
                g22.SetActive (true);
                g23.SetActive (true);
                g24.SetActive (true);
                g25.SetActive (true);
                g26.SetActive (true);
                g27.SetActive (true);
                g28.SetActive (true);
                g29.SetActive (true);
                g30.SetActive (true);
            }
            GameObject.Find (Computer2).GetComponent<BoxCollider> ().enabled = true;
            GameObject.Find (Computer1).GetComponent<BoxCollider> ().enabled = false;
        }

        if (GetComponent<Animator> ().GetCurrentAnimatorStateInfo (0).IsName (Interact)) 
        {
            isInteracting = true;
            GetComponent<PlayerMove> ().enabled = false;
            GetComponent<RotationCheck> ().enabled = false;
            GetComponent<player_animation> ().enabled = false;
            canInteract = false;
        }

        if (!GetComponent<Animator> ().GetCurrentAnimatorStateInfo (0).IsName (Interact))
        {
            isInteracting = false;
            GetComponent<PlayerMove> ().enabled = true;
            GetComponent<RotationCheck> ().enabled = true;
            GetComponent<player_animation> ().enabled = true;
        }
    }
}

And here’s a video of it working (on the video I move the player by dragging the object in the Scene editor to make the video shorter, but it also works when played normally):

Setting Up Guards

Now with all the mechanics and level layout in place, I had to set up the Guards to stand and patrol in the right places. It was a relatively easy process, just took a lot of time and changing numbers as every guard needed to be specified in a few different places. First, I duplicated the Light_Guard objects and put them into place. Then renamed them in the Hierarchy to ‘Light_Guard1’, ‘Light_Guard2’ etc:

Unity_2017-05-24_22-09-29

Then I started duplicating and placing their waypoints and named them accordingly:

Unity_2017-05-24_22-12-05

After that, I had to add all the guards and their waypoints to the Waypoint_Management script, which was a chore but it didn’t take that long:

using System.Collections;
using System.Collections.Generic;
using UnityEngine;

public class Waypoint_management : MonoBehaviour 
{
    public List<GameObject> g1;
    public List<GameObject> g2;
    public List<GameObject> g3;
    public List<GameObject> g4;
    public List<GameObject> g5;
    public List<GameObject> g6;
    public List<GameObject> g7;
    public List<GameObject> g8;
    public List<GameObject> g9;
    public List<GameObject> g10;
    public List<GameObject> g11;
    public List<GameObject> g12;
    public List<GameObject> g13;
    public List<GameObject> g14;
    public List<GameObject> g15;

    public List<GameObject> g16;
    public List<GameObject> g17;
    public List<GameObject> g18;
    public List<GameObject> g19;
    public List<GameObject> g20;
    public List<GameObject> g21;
    public List<GameObject> g22;
    public List<GameObject> g23;
    public List<GameObject> g24;
    public List<GameObject> g25;
    public List<GameObject> g26;
    public List<GameObject> g27;
    public List<GameObject> g28;
    public List<GameObject> g29;
    public List<GameObject> g30;

    public List<List<GameObject>> master;

    void Awake () 
    {
        g1 = new List<GameObject> ();
        g1.Add (GameObject.Find (Guard1_Waypoint1));
        g1.Add (GameObject.Find (Guard1_Waypoint2));
        g2 = new List<GameObject> ();
        g2.Add (GameObject.Find (Guard2_Waypoint1));
        g2.Add (GameObject.Find (Guard2_Waypoint2));
        g3 = new List<GameObject> ();
        g3.Add (GameObject.Find (Guard3_Waypoint1));
        g3.Add (GameObject.Find (Guard3_Waypoint2));
        g4 = new List<GameObject> ();
        g4.Add (GameObject.Find (Guard4_Waypoint1));
        g4.Add (GameObject.Find (Guard4_Waypoint2));
        g5 = new List<GameObject> ();
        g5.Add (GameObject.Find (Guard5_Waypoint1));
        g5.Add (GameObject.Find (Guard5_Waypoint2));
        g6 = new List<GameObject> ();
        g6.Add (GameObject.Find (Guard6_Waypoint1));
        g6.Add (GameObject.Find (Guard6_Waypoint2));
        g7 = new List<GameObject> ();
        g7.Add (GameObject.Find (Guard7_Waypoint1));
        g7.Add (GameObject.Find (Guard7_Waypoint2));
        g8 = new List<GameObject> ();
        g8.Add (GameObject.Find (Guard8_Waypoint1));
        g8.Add (GameObject.Find (Guard8_Waypoint2));
        g9 = new List<GameObject> ();
        g9.Add (GameObject.Find (Guard9_Waypoint1));
        g9.Add (GameObject.Find (Guard9_Waypoint2));
        g10 = new List<GameObject> ();
        g10.Add (GameObject.Find (Guard10_Waypoint1));
        g10.Add (GameObject.Find (Guard10_Waypoint2));
        g11 = new List<GameObject> ();
        g11.Add (GameObject.Find (Guard11_Waypoint1));
        g11.Add (GameObject.Find (Guard11_Waypoint2));
        g12 = new List<GameObject> ();
        g12.Add (GameObject.Find (Guard12_Waypoint1));
        g12.Add (GameObject.Find (Guard12_Waypoint2));
        g13 = new List<GameObject> ();
        g13.Add (GameObject.Find (Guard13_Waypoint1));
        g13.Add (GameObject.Find (Guard13_Waypoint2));
        g14 = new List<GameObject> ();
        g14.Add (GameObject.Find (Guard14_Waypoint1));
        g14.Add (GameObject.Find (Guard14_Waypoint2));
        g15 = new List<GameObject> ();
        g15.Add (GameObject.Find (Guard15_Waypoint1));
        g15.Add (GameObject.Find (Guard15_Waypoint2));

        g16 = new List<GameObject> ();
        g16.Add (GameObject.Find (Guard16_Waypoint1));
        g16.Add (GameObject.Find (Guard16_Waypoint2));
        g17 = new List<GameObject> ();
        g17.Add (GameObject.Find (Guard17_Waypoint1));
        g17.Add (GameObject.Find (Guard17_Waypoint2));
        g18 = new List<GameObject> ();
        g18.Add (GameObject.Find (Guard18_Waypoint1));
        g18.Add (GameObject.Find (Guard18_Waypoint2));
        g19 = new List<GameObject> ();
        g19.Add (GameObject.Find (Guard19_Waypoint1));
        g19.Add (GameObject.Find (Guard19_Waypoint2));
        g20 = new List<GameObject> ();
        g20.Add (GameObject.Find (Guard20_Waypoint1));
        g20.Add (GameObject.Find (Guard20_Waypoint2));
        g21 = new List<GameObject> ();
        g21.Add (GameObject.Find (Guard21_Waypoint1));
        g21.Add (GameObject.Find (Guard21_Waypoint2));
        g22 = new List<GameObject> ();
        g22.Add (GameObject.Find (Guard22_Waypoint1));
        g22.Add (GameObject.Find (Guard22_Waypoint2));
        g23 = new List<GameObject> ();
        g23.Add (GameObject.Find (Guard23_Waypoint1));
        g23.Add (GameObject.Find (Guard23_Waypoint2));
        g24 = new List<GameObject> ();
        g24.Add (GameObject.Find (Guard24_Waypoint1));
        g24.Add (GameObject.Find (Guard24_Waypoint2));
        g25 = new List<GameObject> ();
        g25.Add (GameObject.Find (Guard25_Waypoint1));
        g25.Add (GameObject.Find (Guard25_Waypoint2));
        g26 = new List<GameObject> ();
        g26.Add (GameObject.Find (Guard26_Waypoint1));
        g26.Add (GameObject.Find (Guard26_Waypoint2));
        g27 = new List<GameObject> ();
        g27.Add (GameObject.Find (Guard27_Waypoint1));
        g27.Add (GameObject.Find (Guard27_Waypoint2));
        g28 = new List<GameObject> ();
        g28.Add (GameObject.Find (Guard28_Waypoint1));
        g28.Add (GameObject.Find (Guard28_Waypoint2));
        g29 = new List<GameObject> ();
        g29.Add (GameObject.Find (Guard29_Waypoint1));
        g29.Add (GameObject.Find (Guard29_Waypoint2));
        g30 = new List<GameObject> ();
        g30.Add (GameObject.Find (Guard30_Waypoint1));
        g30.Add (GameObject.Find (Guard30_Waypoint2));

        master = new List<List<GameObject>> ();
        master.Add (g1);
        master.Add (g2);
        master.Add (g3);
        master.Add (g4);
        master.Add (g5);
        master.Add (g6);
        master.Add (g7);
        master.Add (g8);
        master.Add (g9);
        master.Add (g10);
        master.Add (g11);
        master.Add (g12);
        master.Add (g13);
        master.Add (g14);
        master.Add (g15);
        master.Add (g16);
        master.Add (g17);
        master.Add (g18);
        master.Add (g19);
        master.Add (g20);
        master.Add (g21);
        master.Add (g22);
        master.Add (g23);
        master.Add (g24);
        master.Add (g25);
        master.Add (g26);
        master.Add (g27);

        master.Add (g28);
        master.Add (g29);
        master.Add (g30);

    }

    void Update () 
    {
        
    }
}

Then I had to change the Waypoint Index value for every guard in the Inspector to assign them to their waypoints:

Unity_2017-05-24_22-18-59

Then, for the guards that are meant to stand still, I made it so that once they see a player, their patrol points are enabled so if the player runs away, they start patrolling instead. The way I did that was I turned off the ‘FSM_States’ and ‘FSM_Behaviour’ scripts for those guards in the Inspector, and then in the ‘enemy_sight’ script I added a couple of lines of code in the Scan() method to turn them on when the player is seen. Here’s the updated Scan() method:

    void Scan()
    {
        Debug.DrawRay (transform.position + new Vector3 (0f, 1.6f, 0f), transform.forward * 10, Color.red);
        RaycastHit hit;

        if (Physics.Raycast (transform.position + new Vector3 (0f, 1.6f, 0f), transform.forward * 10, out hit, 10)) 
        {
            switch (hit.collider.gameObject.tag) 
            {
            case Player:
                seesPlayer = true;
                GetComponent<FSM_Behaviour> ().enabled = true;
                GetComponent<FSM_States> ().enabled = true;
                playerLastLocation = hit.collider.gameObject.transform.position;
                break;
            }
        }
        else
        {
            seesPlayer = false;
        }
    }

That left me with a working patrol system throughout the level:

2017-05-24_22-23-22

Camera Position

Next I just wanted to attach the camera to the player so that it always follows him, however simply parenting it to the player object in the Hierarchy didn’t work as the who character rotates by 180 degrees when going in the other direction, so the camera messes up, so I had to write a script for it. It was really simple though, so it wasn’t a problem at all, and it was a lot like the script for the Text Mesh. I simply got the position values of the player object, then using ‘new Vector3’ I added some to make sure it’s where I want it to be:

using System.Collections;
using System.Collections.Generic;
using UnityEngine;

public class Camera_position : MonoBehaviour 
{
    void Update () 
    {
        transform.position = GameObject.Find (JackTaylor).transform.position + new Vector3 (11f, 1.3f, 0f);
    }
}

Here’s a gif of it working:

2017-05-24_21-44-13.gif

Dimension Switch

Next I had to implement the ability to switch between the Present and Future dimensions. It was relatively simple, but I needed to organise the Hierarchy first because it was really messy. So I split the objects into Present and Future using a couple of Empty Child objects. Then within those objects, I created a few more Empty Child objects to organise the objects into groups like Chairs, Tables, Walls etc. Here’s an example:

Unity_2017-05-24_21-21-16

I also took some time to align the Present and Future dimensions perfectly so that when you switch, the character will stay in the same place, just with everything swapped. After that, I applied a new script to the LevelController object, with a couple of bools and a few references to the Empty Child objects I made when organising. Then I created a new method called “SwitchDimensions()” which checks if the “switcher” bool is set to true (which it is by default), and if so it will set the ‘Present’ and ‘PresentGuards’ objects to true, and the Future ones to false. And it will do the opposite is “switcher” is set to false. Then in the Update() method, I made it so that ‘canWarp’ is set to true if player has enough WarpCharge, and then another if statement that executes a few commands when Q is pressed while “canWarp” is true with enough WarpCharge. The commands that are executed are changing “switcher” to false, to make sure the enemy no longer sees the player after changing dimensions and to turn off any text meshes etc to make sure they don’t stay on after warping. I also called the SwitchDimensions() method there to make sure it checks every frame which dimension it’s currently meant to be in.

using System.Collections;
using System.Collections.Generic;
using UnityEngine;

public class Dimension_Switch : MonoBehaviour 
{
    private GameObject presentLayout;
    private GameObject futureLayout;
    private GameObject presentGuards;
    private GameObject futureGuards;
    private bool switcher;
    private bool canWarp;

    void Start () 
    {
        presentLayout = GameObject.Find (Present);
        futureLayout = GameObject.Find (Future);
        presentGuards = GameObject.Find (PresentGuards);
        futureGuards = GameObject.Find (FutureGuards);
        switcher = true;
        canWarp = true;
    }

    void SwitchDimensions()
    {
        if (switcher) 
        {
            presentLayout.SetActive (true);
            presentGuards.SetActive (true);
            futureLayout.SetActive (false);
            futureGuards.SetActive (false);
        } 
        else 
        {
            presentLayout.SetActive (false);
            presentGuards.SetActive (false);
            futureLayout.SetActive (true);
            futureGuards.SetActive (true);

        }
            
    }

    void Update () 
    {
        if ((int)GameObject.Find (JackTaylor).GetComponent<PlayerStats> ().GetStat (2)  20 > 0) 
        {
            canWarp = true;
        } 
        else 
        {
            canWarp = false;
        }

        if (Input.GetKeyDown (q) && canWarp && ((int)GameObject.Find(JackTaylor).GetComponent<PlayerStats>().GetStat (2)  50 >= 0))
        {
            if (switcher) 
            {
                GameObject.FindWithTag (Enemy).GetComponent<enemy_sight> ().seesPlayer = false;
                GameObject.Find (JackTaylor).GetComponent<Door_closed> ().canInteract = false;
                GameObject.Find (StairsText_Up).GetComponent<MeshRenderer> ().enabled = false;
                GameObject.Find (StairsText_Down).GetComponent<MeshRenderer> ().enabled = false;
                switcher = false;
            }
            else 
            {
                GameObject.FindWithTag (Enemy).GetComponent<enemy_sight> ().seesPlayer = true;

                switcher = true;
            }
        }
        SwitchDimensions ();
    }
}

Here’s a gif of it working:

2017-05-24_21-39-04.gif

Interactable Objects

Next thing I did was make scripts for interacting with Computers and Buttons, which I’ve written about before but I’ll do it again for the actual objects rather than cubes. It was relatively simple, all I had to do was create a Box Collider set to “is Trigger” that’s positioned where the player would be to interact with it, and tagged the object Computer/Trigger. Then I attached new scripts to the player object, inside them I referenced the Animator and made a couple of bools for whether or not the player can interact with them and whether or not the player is interacting with them. Then, using OnTriggerEnter and OnTriggerExit, Unity would check if the object is Tagged as “Computer” or “Button”, and if so they would set the “canInteract” bool to true and enable the Mesh Renderer of a Text Mesh object (more about it later), and would do the opposite when leaving the trigger. Then, in the Update() method, I added an if statement to say “if E is pressed and canInteract is true, play the correct animation, set “isInteracting” to true and turn off the Text mesh”. I then also added another if statement to turn off the movement, rotation and animation scripts while the animation is being played to make sure the player can’t move while interacting with the button or computer. Below is the full script:

using System.Collections;
using System.Collections.Generic;
using UnityEngine;

public class player_button : MonoBehaviour {

    public Animator anim;
    private bool canInteract;
    private bool isInteracting;

    void Start () 
    {
        anim = GetComponent<Animator>();
        canInteract = false;
        isInteracting = false;
    }

    void OnTriggerEnter(Collider other)
    {
        if (other.tag == Button) 
        {
            canInteract = true;
            GameObject.Find (TextInteract).GetComponent<MeshRenderer> ().enabled = true;
        }
    }

    void OnTriggerExit(Collider other)
    {
        if (other.tag == Button) 
        {
            canInteract = false;
            GameObject.Find (TextInteract).GetComponent<MeshRenderer> ().enabled = false;
        }
    }

    void Update () 
    {
        if (Input.GetKeyDown (e) && (canInteract == true)) 
        {
            anim.Play (Press Button, 1, 0f);
            isInteracting = true;
            GameObject.Find (TextInteract).GetComponent<MeshRenderer> ().enabled = false;
        }

        if (GetComponent<Animator> ().GetCurrentAnimatorStateInfo (0).IsName (Press Button)) 
        {
            isInteracting = true;
            GetComponent<PlayerMove> ().enabled = false;
            GetComponent<RotationCheck> ().enabled = false;
            GetComponent<player_animation> ().enabled = false;
        }

        if (!GetComponent<Animator> ().GetCurrentAnimatorStateInfo (0).IsName (Press Button))
        {
            isInteracting = false;
            GetComponent<PlayerMove> ().enabled = true;
            GetComponent<RotationCheck> ().enabled = true;
            GetComponent<player_animation> ().enabled = true;
        }
    }
}

The text mentioned above was made using 3D Text Mesh in Unity. I created that, changed the text in the Inspector to say what I wanted it to say, then attached a script to it called text_move. In the script, I just added one line in the Update() method, which just takes the player’s position values and adds 3 in the Y axis to make sure it’s slightly above the character at all times:

    void Update () 
    {
        transform.position = GameObject.Find (JackTaylor).transform.position + new Vector3 (0f, 3f, 0f);
    }

Here’s a gif of it working:

2017-05-24_21-10-15.gif

Unity ‘Collab’

While playing around with Unity’s interface, I found a feature called “Collab” which allows you to send your project to the Cloud, and then invite other Unity users via email to work with you on the project. The way it works is it checks which files you’ve changed since last update and then you can choose to upload changes to the cloud, and as soon as you do, other people in that project get the ability to download your changes seamlessly.

This allows us to work together and keep up to date with each other’s work and progress constantly, as well as easily do play-testing amongst the group. This feature is only in Beta, but it seems to be working in a relatively stable manner so far. It has already come in handy as George has been working on the level itself while I worked on the mechanics for the Player on the level, and I could tell him to tweak certain things and I could get those changes without using memory sticks, moving/importing files or anything like that. It’s super quick and we found it really useful as a group.

When you make changes to the project and save, you can use the dropdown menu on the top right of Unity to Publish changes. The dropdown menu gives you an option to write what changes have been made, as well as see which files have been changed, and you can click the icons to see the differences or to revert changes of the individual files:

Overall it’s a very useful feature and I will definitely be using it until the end of this project as well as in future group projects.